The table, all 12 foot by 4 foot of it obviously belongs to Maelstrom Games, however all the scenery used on the table is out of my own collection. We had all day to play which as it turned out was just as well, so carefully choosing a scenario that did not finish by turn 6 and one we could adapt for our purpose was needed, so looking through the mission section of the rule book, we decided to use the scenario 'Hold the Line'. However as we had all day to play we wanted more than several turns, so we added an additional 3 turns to front end of the game, so for example I was not rolling for delayed reserves etc until turn 6, this would allow the Allies to move over the large playing area without being penalised, and it also to allowed us to use the Night Fight rules for good measure.The basis of the game was that the assault was planned for dawn and all movement was potenially done under cover of darkness, however we did start rolling for dawn to arrive form turn 3 as specified in the main rules.
Set up was done between 9.30am and 10.30am, we actually started playing by 10.45am and we finished the on turn 22 at 5.00pm! And not a tank in sight, pretty unusual for my games.
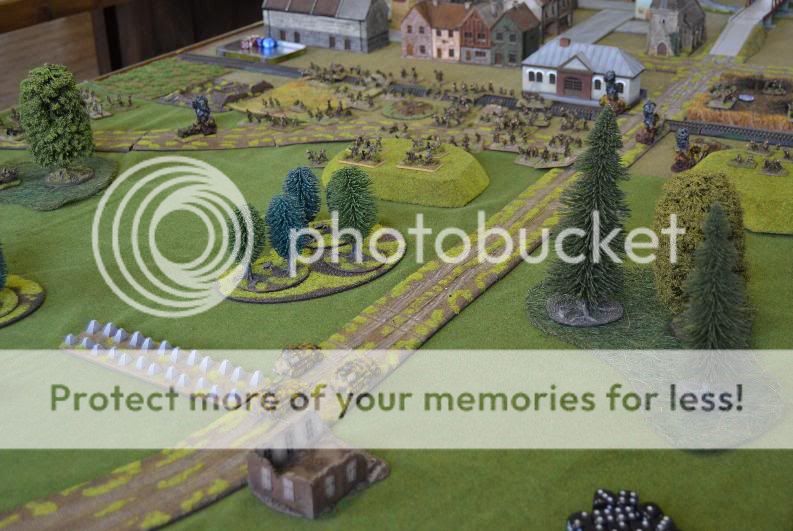
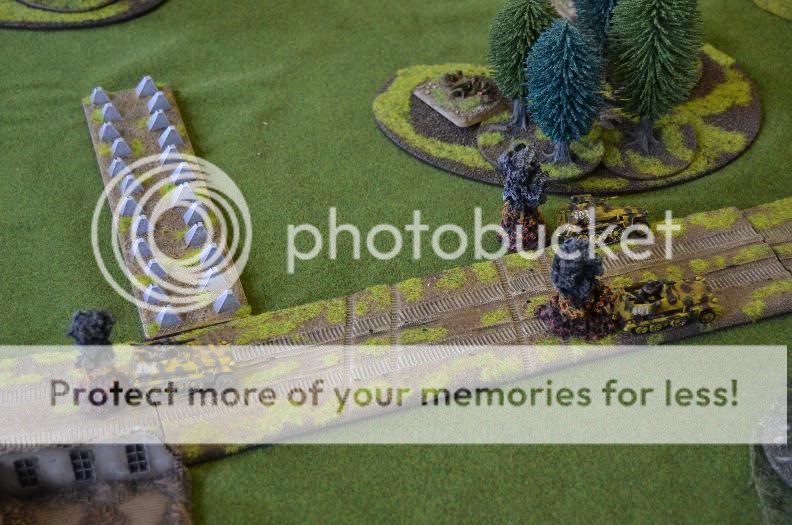
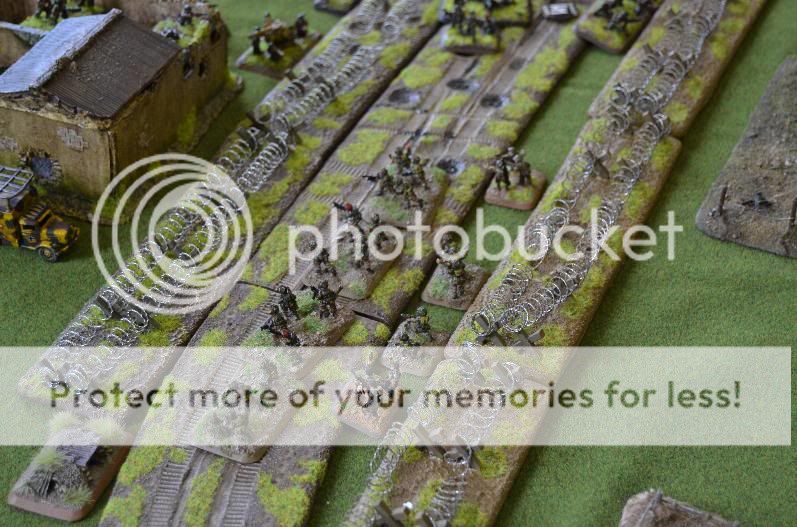
So here are some pictures of the table layout and the game, a Luftwaffe airfield somewhere in France in 1944 is about about to be attacked by an elite unit of British Para's. Unfortunately we got so engrossed in playing we forgot to take pictures more frequently.
The forces consisted of two companies of British Paratroopers, with Priority and Sporadic air support, light artillery and some anti tank guns.

The German forces comprised of part 1, a company of Fallschirmjager with fortifications and Luftwaffe AA support.


The battlefield.

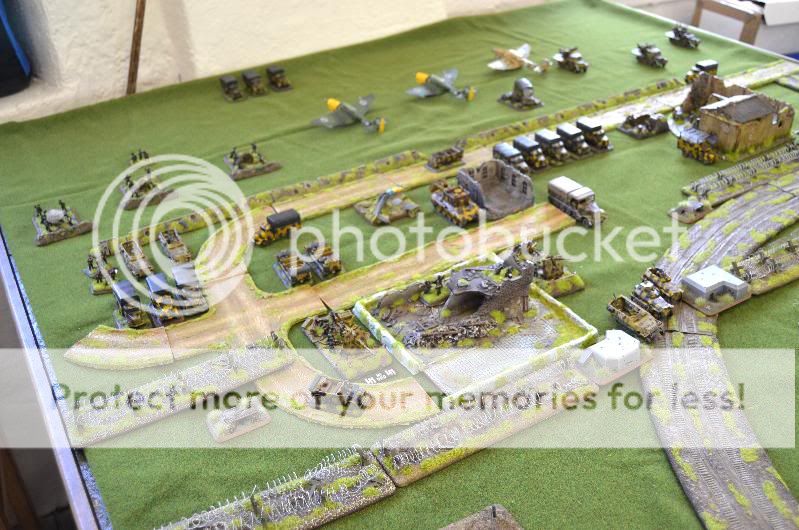

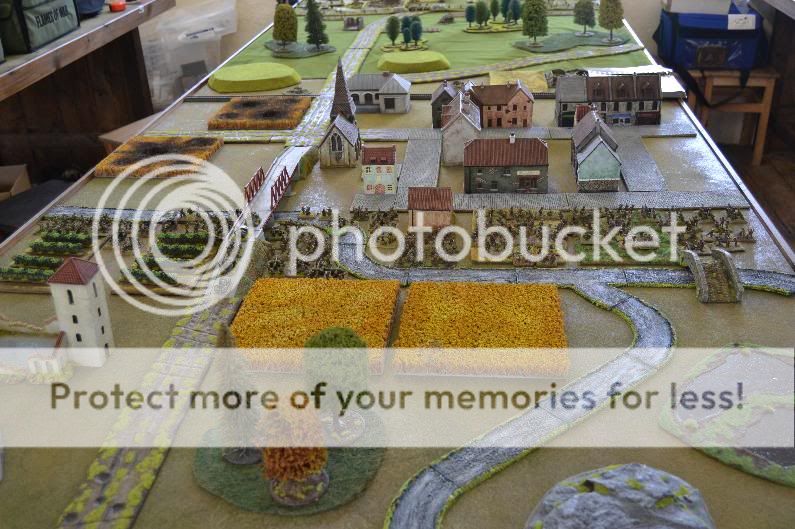
The Allies have to capture one, or both of the two objectives in the German deployment area, objective one is the crashed ME109, and the second objective is the command post next to the large ruined building.
Turns one to three:
The British para's move up the table at full speed, using the terrain and cover for concelament.
The German half track recon patrol moves towards the town on its patrol sweep.
Turn four, no dawn rolled.
The British move through and occupy some of the buildings on the outer edge of the town.
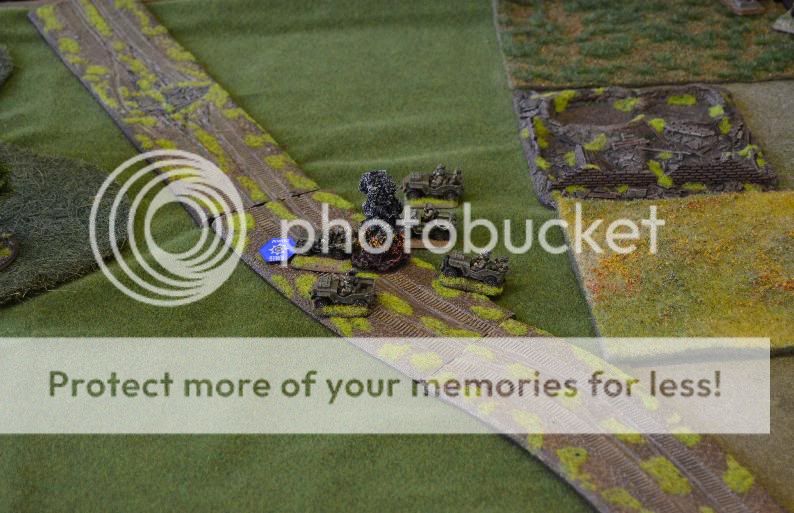
The German recon platoon moves close and spot something trying to move into a field, they immediately open fire, rolling a 6 to see if they could see the target and reveal a gun team trying to hide, one of the gun teams is destroyed by the command half tracks 3.7cm cannon, along with an infantry team cut down by one of the other half tracks MGs trying to make for the field. The recon platoon radio back to base and the alarm is raised.

Turn Five, no dawn rolled.
The para's move as quickly as possible now that the jig is up, a platoon of Jeeps race out of cover using nearby woods as cover, the gun teams shot at during the last round return fire destroying two of the half tracks and bailing the third. The survivors of the recon platoon successfully manages to pass their motivation check and live to fight on, albeit out of the half track at this point.
The crew of the half track successfully roll to remount their vehicle and realising that a large enemy force is nearly upon them elect to stay and try to stem the tide. The half tracks gunners open up destroying another of the gun teams but to failing to do little else.

As if on cue a flight of three Royal Airforce Typhoon's attempt to strafe the airfield and take out the MW42s.
The para's shoot at and bail the command half track, however the vehicle is assaulted and destroyed by he teams in the train station.
The remainder of the attacking force force move forward at the double where ever possible, using the intervening scenery as cover. The Tyhoon's sweep low over the airfield but all three planes are shot down by the platoon of Luftwaffe 88s AA guns.

Turn 7
Nothing of any significance happened in this round other than both sides movement, pretty much no shooting worth mentioning from either side
Turn 8.
One flight of two Typhoons appears and are promptly shot down by the AA half tacks.
Both side maneuver into better positions or move at full tilt to reach the objectives, little to no shooting to speak of.
Turn 9.
Another flight of two Typhoons.
The para's move at top speed utilizing all the terrain and cover to block line of sight. The para mortar platoon moves on to the hill to get a good vantage point. The 88s shoot down two more Typhoon's trying to knock out the NW42s.
The Germans receive two more platoons of reinforcements, the two Fallshirmjager platoons move onto the table from the rear edge of the board.

The recon patrol races to intercept the attackers. The NW42s fire again but fail to do anything, other than pin the infantry target they fired upon. The 88s shoot down two more Typhoon's.
Turn 10.
Two lots of attacking Typhoons this turn, in two flights of two.
While most of the British pars move at best speed through the woods, a heavy MG platoon sets up position at the edge of a wood on the right hand side of the road, while the remainder of the 6 pounder platoon savaged by the recon half tracks in the earlier rounds set up in the wood on the left side of the road to provide covering fire. The howitzers are towed into a copse of trees, all passing their bogging checks and the rest of the para's move as best they can.
The mortars smoke the 88s, something that was to happen on nearly every round after this one, so the effective AA fire so far enjoyed by the Germans was pretty much ended. The 6 pounders open up on the recon half tracks and bail one. One flight of Typhoons are shot out of the sky by the light AA battery, however the other flight attacks the reaming two recon half tracks destroying both. The platoon fails it motivation check and is destroyed.

By this point the airfields primary ground defenses are in range, two platoons of 4 HMG teams and two HMG bunkers, all fire at whatever target they can see, and there are plenty of targets to choose from, the result of 60 HMG all firing dice ends up shredding one infantry platoon reducing it to under 50% and pinning it, but being fearless vets pass their motivation and live to fight on. The HMG platoon on the edge of the woods is reduced by one team and is pinned, as is the 6 pounder platoon. The NW42s have a target this round, the Jeeps trying not to get bunched up present a too tempting target and are promptly bombarded, destroying two more vehicles and their infantry teams, and then promptly failing their motivation test for losing more than 50% of the platoon and are destroyed. The AA half tracks do a stormtrooper move to get closer to the advancing Brits.
Turn 11.
No aircraft this turn, the mangled para infantry platoon fails its motivation and remains pinned, however the HMG platoon un pins itself. The howitzers make one final move just hovering on the edge of the wood, again all passing their bogging checks. The mortars smoke the 88s, the second mortar platoon having moved into a protected position now starts to bombard the defenders. The HMG platoon fires and while scoring a respectable amount of hits causes no casualties on the Fallschirmjager HMG platoon, but does pin them. The 6 pounders fire on the HMG platoon with no effect as they are under the smoke laid down by their comrades.

Turn 12.
Again no Allied aircraft. All pinned units un pin, the 88s are once again smoked, and two bargarges come in form the howizters and the second mortar team. This barage resulted in pinning three entire platoons manning the defenses but the Germans suffered no other casualties. The HMG and the 6 poiunders concentrate all their fire power on the AA half tracks and the Grenadier platoon directly in front of the, but to no avail, the allies rolled appallingly not even getting enough hits to pin the Grenadiers.
The Germans managed to un pin the HMGs, but the second Grenadier platoon was firmly pinned, the light AA battey managed to un pin too.
The AA half tracks the Grenadiers, along with all the HMGs poured yet another withering volley at the attackers, this round saw a 6 pounder gun team destroyed and another HMG team bit the dust. The NW42s managed to fire on the third attempt, killing one team and pinning two platoons.

No aircraft again, the 88s were smoked, and more smoke bombardments from the second mortar on the HMG/Grenadiers, the howitzer failed to hit as did the HMG and 6 pounders, although the Brits were virtually at the barricades.
The Germans had about as much luck as the British and caused no casualties this turn.
Turn 14
An exact duplicate of turn 10 for both sides, although the first of the British Para's successfully crossed the first of the two line of barrciades.

A slightly better round. One flight of two Typhoons appeared. The 88s were once again smoked, as were the HMGs and light AA battery behind the defense, a clear run for the aircraft this round. The HMGs and the 6 pounders again tried to knock out the half track AA and Grenadiers, without much success it does have to be said. The howitzers managed to kill a couple of the Grenadier teams manning the defenses, but other than that casualties were light, with one AA half track bailed out.

The Typhoon's screamed in and made their attack run, and bailed out all four of the half tracks that they had attacked, well what a let off that was for the German defenders.
The German reply was quite emphatic, 60 dice of HMG shredded yet another para platoon and reduced the previously shredded platoon to one last surviving team, the HMG platoon was reduced to below 50%, but yet again the Brits passed their motivation to fight on. One of the howitzers bit the dust, and the MW42s pinned the troops trying to move up in support. The AA half tracks and the remaining teams of the Grenadier platoon we proving to be a thorn in the side of the para's trying to get to the barricades, the German teams were knocking out the odd team here and there but it was wearing away the amount of available troops to make the final push fort the objectives.
Turn 16
No aicraft.
The lone para passed his man alone check and proceeded to move to the rear, the leading paratroops already across the first of the barbed wire barricades dig in and wait for support. The 6 pounders move into short range and try to get shots in at the Fallschirmjager HMG platoon, the 88s are smokedr the light AA platoon. The two 6 pounder gun teams fire and knock out a HMG team. The allied HMG platoon manged to kill two teams of Grenadiers, and knock out a AA half track.
The NW42 had no targets as once again the spotter was under the smoke, so the spotter bravely moved closer to the at the barbed wire to try to see something. The Germans poured fire into the dug in troops, killing two teams, yet more British teams fell to the AA half tracks and the Grenadiers. The 88s now had a viable target as the 6 pounder platoon had moved under 16 inch allowing them to shoot, however it now allowed the AA guns to return fire, the 88s opened up and the 6 pounder platoon was completely destroyed.
Turn 17
No aircraft. This is the last turn that the allied player was able to use the Typhoon's.
The sole para team making their way to safety fail their man alone check. More para' s cross the barbed wire. The 88s are smoked, as are the light AA battery and HMGs. Two para platoons move to within 2 inches and shoot at the Grenadiers preparing to assault, two teams go down. The surviving HMG teams bail a AA half track. The howitzers drop a bombardment onto to a Grenadier platoon not under the smoke near to the light AA battery, no Grenadiers are killed but one of the light AA guns is knocked out and all three defending platoons are pinned. The para's take this opportunity to assault, the first assault is bounced as the para's are hit by several shots from the AA half tracks and Grenadiers . The second assault went better for the Brits and three teams of Grenadiers are killed, along with an HMG team, the Germans fail their motivation and fall back in confusion.
Two of the three pinned platoons fail to rally, only the HMG platoon passed its motivation. The AA half track crew remount the vehicle and the Fallschirmjager HMG platoon move to support the crumbling defenses. The Bunker HMGs finish off the allied HMG at the edge of the woods. The MW42 spotter no had a target, the mortar platoon on the hill, and a bombardment was successfully called in reducing the mortar teams down to two teams and its command team. The AA half track and Grenadiers, finished off the second mauled para platoon. The para's were near to the objective but were running out of manpower.
Turn 18.
The mortars did not smoke the 88s this turn, rather trying to pin the the HMG platoon which they successfully did. The remaining para's facing the AA half tracks knocked bailed out both vehicles and reduced the grenadiers down to two teams, then assaulted, only one team was killed and passing their motivation the remaining Grenadier assaulted and killed a para team only to fall in the counter assualt, the AA half tracks were destroyed, but had held up a significant number of para's for about four rounds. The Para's then turned their attention to the assault of the HMGs, defensive fire killed two British teams, however the remaining HMG teams, the last of the second Grenadier platoon and the last light AA gun were all destroyed in the assaults.
The Germans were now on the back foot, however two full Fallschirmjager platoons held both the objectives and a full Grenadier platoon was moving to cut off the now very depleted para's. Only one 88 could fire however its three shots killed a team, and the HMG nest killed two more teams. At this point the para's did not have one intact platoon left, but had so far only failed one motivation test.
Turn 19.
The para's moved closer to the objectives, allowing the now freed up stragglers the chance to catch up, smoke was dropped onto the closest objective, the reduced mortar platoon failed to hit, however the howitzers hit the Fallshirmjager HMG platoon and killing two with the two remaining teams failing their motivation. The para's poured shots into the HMG nest and assaulted taking the nest out.
The two Fallschrimjager platoons stood firm behind their entrenchments but were having trouble hitting anything due to all the smoke. The 88 took out another team. The MW42s hit and pinned the mortar team on the hill.
Turn 20.
This was getting close, one more lost platoon on each side and both sides were going to be below 50% and need to take company morale checks.
The paras had to assault to win, there was no other way, so more smoke was dropped from both mortar teams to provide concealment and a bombardment from the a howitzers, which pinned the last Grenadier platoon and the closest Fallshirmjager platoon. The para's assaulted and killed three teams, the FJ passed their motivation and counterattacked killing two para teams. Another assault by the Brits killed another two FJ teams, and the the defenders failed their motivation and fell back allowing the para's onto the objective.
The Fallschimjager rallied and moved to attack, the last Grenadier platoon stood its ground and shot through hr smoke, knocking out one team, the Fallschirmjager shot but failed to cause a wound, the 88 missed as well. In the assault only one team was killed, however the counter assault just killed one FJ team which just happened to be the 2iC, so the fight continued with the Germans killing the remaining para's, although that platoon was now down to only four teams.
Turn 21
This was going to be make or break. As expected in came the smoke from the mortars, however the short platoon missed, the howitzers were silent as their spotters could see nothing of the target area. However more than half of the para's remaining troops were four turns away if they doubled and the Germans still had the two HMG bunkers and one surviving HMG nest, not counting the 88s, so the assaulting para's were unlikely to get assistance from that quarter.
The para's on the far side of the building that had assaulted and taken out the AA guns moved to attack the building, the building was occupied by the last Grenadier platoon and the FJ 1iC, the para's shot and took out two of the seven teams, hitting enough times to pin the platoon. The resulting assault saw three more teams go down one of them was the 1iC, however the Grenadiers successfully counter assaulted killing two of the para team's. The para's once again counter assaulted and wiped out the Grenadiers, now putting the Germans in the position of needing to take a company morale check. The para's consolidate and take the objective.
Right then, fail this roll and its all over, however fate or the dice gods had one last trick to play on us, more on that in a minute or two.
The Germans passed their company morale test, the last four teams of the short FJ platoon cannot get to within four inches of the objective as the para's have teams in the way. So half of the second FJ platoon moved along the trench lines half of the platoon holding one objective while supporting the other platoon. Both platoons fire and pin the para's and the short FJ platoon goes in and promptly kills absolutely nothing, however the para's fail to counter assault, so the FJ withdraw, leaving the para's holding the objective. However the good news is that the last team the FJ killed in the shooting phase finished off another platoon, which now meant that the para's had to take a company morale test.
Turn 22.
All John has to do is pass the company morale test to win the game, he rolls the dice and its a 1, I have never heard such language as I heard that day, right re roll time using his British Bulldog special rule, one of his surviving 1iCs is one of the teams at the objective, the other 1iC had perished in the conflagration of HMG fire several turns earlier.
So all John had to do was roll a 3+ on his re roll to win the game, what does he roll another 1, well I thought the language had been bad on the first roll, my my I have never heard the like. So although John had taken the objective, all of his remaining troops ran off, granted there were not that many left to be honest.
I tried not to laugh to much, as all I have to do is pass my company morale test, and promptly go and do exactly the same thing and roll a 1. So all my remaining troops run off too.
We had virtually wiped each other out by the end, although I had one of my HQs and three complete platoons left, with one part platoon, John had no intact platoons at all, but at least one more surviving platoon than I did.
What an end to the game, that was one we could not have predicted.
It was a good game, very enjoyable indeed, it took all day to set up and play, actual playing time was about five and a half hours, we were not hanging about either, we got to turn six in under well under an hour, and getting 21 full turns in the time we played was quite fun.